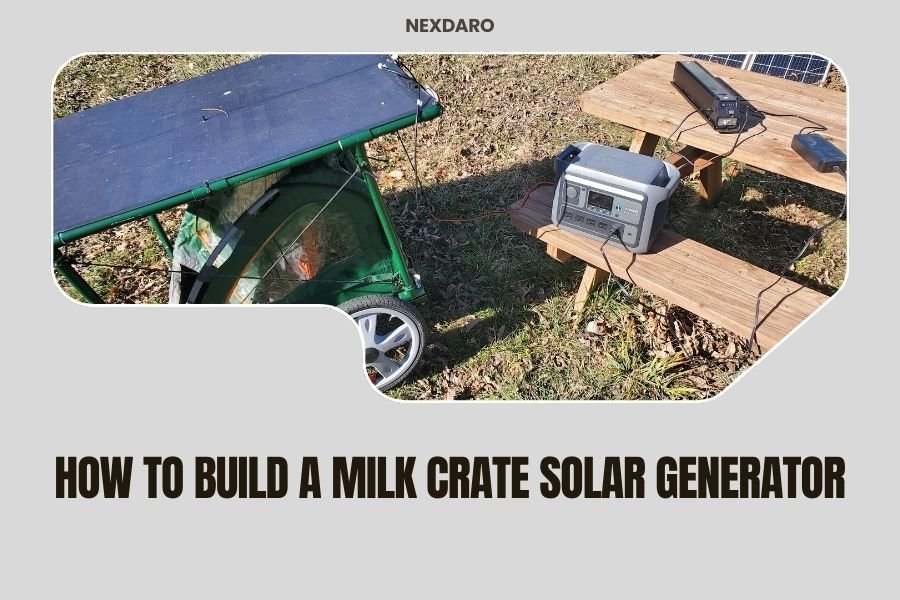
Building a milk crate solar generator requires a 12V battery, solar panel, charge controller, and inverter assembled in a sturdy plastic milk crate. This portable power station can charge phones, run small appliances, and provide emergency backup power for under $300.
You’ll need basic tools like a drill, wire strippers, and electrical tape to complete this DIY project in about 2-3 hours. The milk crate design makes your solar generator lightweight and easy to transport anywhere.
What Makes Milk Crate Solar Generators So Popular
Milk crates are perfect for DIY solar generators. They’re cheap, durable, and have built-in ventilation holes that keep your battery cool.
The square shape fits most 12V batteries perfectly. You get easy access to all components when you need maintenance or upgrades.
From what I researched, many outdoor enthusiasts prefer milk crate builds because they’re lightweight. A complete setup weighs about 25-30 pounds compared to 50+ pounds for commercial units.
Essential Components You’ll Need
The Power Core Components
Your milk crate solar generator needs four main parts to work properly:
- 12V deep cycle battery (AGM or lithium recommended)
- Solar charge controller (PWM or MPPT type)
- Pure sine wave inverter (300W-1000W)
- Solar panel (100W minimum for decent charging)
Battery Selection Guide
AGM batteries cost less upfront but weigh more. A 100Ah AGM battery runs about $150-200 and weighs 65 pounds.
Lithium batteries cost more but last longer. A 100Ah lithium battery costs $400-600 but weighs only 25 pounds and lasts 3,000+ cycles.
I found that most people start with AGM batteries to keep costs down. You can always upgrade to lithium later.
Solar Panel Considerations
A 100W solar panel generates about 30 amp-hours per day in good sunlight. That’s enough to charge phones, tablets, and run LED lights.
For more power, consider a 200W panel. It doubles your charging capacity but costs about $100 more.
Tools and Materials Shopping List
Required Tools
- Drill with various bit sizes
- Wire strippers
- Electrical tape
- Multimeter for testing
- Screwdrivers (Phillips and flathead)
Additional Materials
- Heavy-duty plastic milk crate
- 12-gauge copper wire (red and black)
- Fuses and fuse holders
- Battery terminals and lugs
- Mounting brackets for components
Step-by-Step Assembly Process
Step 1: Prepare Your Milk Crate
Clean your milk crate thoroughly. Check for cracks or damage that could affect stability.
Plan your component layout before drilling. The battery goes on the bottom. Place the charge controller and inverter on opposite sides for better airflow.
Step 2: Install the Battery
Your battery is the heaviest component. It needs to sit securely in the bottom of the crate.
Use foam padding or rubber mats to prevent the battery from sliding around. This protects both the battery and crate from damage.
Battery Safety Tips
Always disconnect power before working on electrical connections. Wear safety glasses when handling batteries.
Keep metal tools away from battery terminals to avoid short circuits.
Step 3: Mount the Charge Controller
The charge controller protects your battery from overcharging. Mount it on the side of the crate where you can see the display.
Drill holes for the mounting screws. Use the template that comes with your controller for accurate spacing.
PWM vs MPPT Controllers
PWM controllers cost $20-40 and work fine for basic setups. MPPT controllers cost $60-150 but extract 20-30% more power from your panels.
I found that MPPT controllers pay for themselves if you use your generator regularly.
Step 4: Install the Inverter
Mount your inverter on the opposite side from the charge controller. This spreads the heat load and makes wiring easier.
Leave at least 3 inches of clearance around the inverter for cooling. These units get hot under load.
Pure Sine Wave vs Modified Sine Wave
Pure sine wave inverters cost more but work with all electronics. Modified sine wave inverters are cheaper but can damage sensitive devices.
Stick with pure sine wave if you plan to charge laptops or run medical devices.
Wiring Your Solar Generator Safely
Basic Wiring Sequence
Wire your components in this order to stay safe:
- Battery to charge controller (with fuse)
- Solar panel to charge controller
- Battery to inverter (with fuse)
- Add monitoring displays last
Fuse Protection is Essential
Install fuses close to your battery’s positive terminal. Use a 30A fuse for the charge controller and match your inverter’s requirements.
Fuses prevent fires if wires get damaged or connections come loose.
Wire Gauge Matters
Use 12-gauge wire for charge controller connections. Your inverter might need 4-gauge or 6-gauge wire depending on its size.
Undersized wire creates heat and voltage drops that hurt performance.
Testing and Troubleshooting
Initial System Tests
Before connecting your solar panel, test all connections with a multimeter. Your battery voltage should read 12.6V-12.8V when fully charged.
Turn on your inverter and test with a small load like a phone charger. Check that all displays show correct readings.
Common Problems and Solutions
Inverter Won’t Turn On
Check your battery connections first. Loose connections cause most startup problems.
Verify that your battery has enough charge. Most inverters won’t start below 11.5V.
Solar Panel Not Charging
Use your multimeter to test panel voltage in direct sunlight. You should see 18-22V from a 12V panel.
Check the charge controller connections. Wrong polarity can damage the controller.
Power Output and Runtime Expectations
What Can You Actually Run
A 100Ah battery with a 300W inverter handles these loads well:
| Device | Power Draw | Runtime |
|---|---|---|
| LED light strip | 12W | 80+ hours |
| Laptop charging | 65W | 12-15 hours |
| Mini fridge | 120W | 6-8 hours |
| CPAP machine | 40W | 20+ hours |
Recharge Times
A 100W solar panel needs 8-10 hours of good sun to fully recharge a depleted 100Ah battery. Cloudy days extend this to 12-15 hours.
You can also recharge from your car’s 12V outlet in about 6-8 hours while driving.
Maintenance and Care Tips
Monthly Maintenance Tasks
Check all wire connections for tightness. Vibration from transport can loosen terminals over time.
Clean your solar panel surface. Dust and debris reduce power output by 10-20%.
Battery Care
Don’t let AGM batteries discharge below 50% regularly. This shortens their lifespan from 500 cycles to 200 cycles.
Store your generator with the battery at 50-80% charge. Full discharge during storage damages battery chemistry.
Winter Storage Tips
Cold weather reduces battery capacity by 20-30%. Bring your generator indoors when temperatures drop below 20°F.
Check battery voltage monthly during storage. Recharge if it drops below 12.4V.
Cost Breakdown and Budget Options
Basic Build Budget
You can build a functional milk crate solar generator for under $300:
- 100Ah AGM battery: $150
- 100W solar panel: $80
- PWM charge controller: $25
- 300W inverter: $60
- Wiring and accessories: $30
Premium Build Options
A high-end build with lithium battery and MPPT controller runs about $800. This setup lasts longer and performs better in all conditions.
The premium build pays for itself if you use solar power regularly for camping or emergency backup.
Safety Considerations
Electrical Safety Rules
Never work on live circuits. Disconnect your battery before making any changes.
Use proper personal protective equipment. Safety glasses and insulated tools prevent accidents.
Fire Prevention
Keep a fire extinguisher rated for electrical fires nearby when building or testing your system.
Install all fuses and circuit breakers according to manufacturer specs. These are your first line of defense against electrical fires.
Battery Ventilation
AGM batteries can vent hydrogen gas when overcharged. The milk crate’s holes provide natural ventilation for safety.
Never seal your generator completely. Air circulation prevents dangerous gas buildup.
Conclusion
Building your own milk crate solar generator gives you portable power at a fraction of commercial unit costs. With basic tools and about 3 hours of work, you’ll have a reliable power source for camping, emergencies, or off-grid living.
Start with a simple AGM battery setup if you’re new to solar. You can always upgrade components later as your needs grow. The modular design makes improvements easy without starting over.
Remember that safety comes first. Take your time with connections, use proper fuses, and test everything before heading into the field. A well-built milk crate solar generator will serve you reliably for years.
How long does it take to build a milk crate solar generator?
Most people complete their first build in 2-4 hours. The actual assembly takes about 2 hours, but planning your layout and testing connections adds extra time. Having all components and tools ready before starting speeds up the process.
Can I use car batteries instead of deep cycle batteries?
Car batteries aren’t recommended for solar generators. They’re designed for short, high-current bursts to start engines, not the deep discharge cycles solar systems require. Deep cycle batteries last 3-5 times longer in solar applications and provide more usable capacity.
Will my generator work during cloudy weather?
Solar panels still generate power on cloudy days but at reduced capacity. Expect about 10-25% of normal output depending on cloud thickness. Your battery provides power when solar input is low, which is why battery capacity matters more than panel size for reliability.
How do I know what size inverter to choose?
Add up the wattage of all devices you want to run simultaneously, then multiply by 1.25 for safety margin. A 300W inverter handles most small electronics, while 1000W inverters can run power tools or small appliances. Bigger isn’t always better since larger inverters drain your battery faster when idle.
Can I expand my system later with more solar panels?
Yes, but your charge controller must handle the additional panel wattage. Most basic controllers max out at 200-400 watts of solar input. Adding panels beyond this limit requires upgrading to a larger controller. Always check your controller’s specifications before adding panels.