How to Set Up Jackery Solar Panels
To set up Jackery solar panels, unfold the panel in direct sun, aim it at the sun, connect the right Jackery plug, and confirm charging on the station display. Check your station input limits first, because the station draws only what it can accept.
On this page (10 sections)
- How to set up Jackery solar panels in six steps
- Which Jackery plug does my station need?
- How do you position a portable panel for the best watts?
- How much solar power can your Jackery accept?
- Which panel suits a Jackery setup?
- When do you need an adapter or extension cable?
- How do you set up Jackery solar panels for camping and RV use?
- What mistakes slow Jackery solar charging?
- How do you check that charging is working?
- How to set up Jackery solar panels: final checklist
To set up Jackery solar panels, unfold the panel in direct sun, aim it at the sun, connect the right Jackery plug, and confirm charging on the station display. That short sequence works for most Jackery stations, but the plug type and input limit decide the details.
Start with your station, not the panel. Find the solar input label or manual page and note the maximum watts, voltage range, and plug size.
A panel can be fine and still charge slowly if it asks for more power than the station will take.
How to set up Jackery solar panels in six steps
Unfold, position, connect, and verify is the core order for how to set up Jackery solar panels. Keep the panel out of shade and the cable connection dry.
- Read the station input limit and plug type.
- Unfold the panel fully and set any kickstands.
- Place it in direct sun and angle it toward the sun.
- Connect the panel cable to the matching Jackery input.
- Watch the station display for input watts.
- Adjust the angle every hour or so as the sun moves.
If the display shows zero watts, reseat the plug and check polarity markers. Different brands may wire connectors differently, so match the station label rather than guessing from wire color alone.
Use an adapter only when the plug sizes differ. Our guide to the best solar panel adapter for jackery explains the common tip sizes and when a kit beats a single cable.
Which Jackery plug does my station need?
Match the plug to your exact station model, because Jackery has used several DC sizes across its range. The input label on the station is the safest guide.
Many smaller and older Jackery units use DC7909, the 8 mm barrel plug. Some larger and newer units use DC8020, a slightly larger barrel plug.
The original Explorer 1000 is often paired with Anderson in third party panel cables, while newer Explorer 1000 V2 setups often use DC8020.
That mix is why a 5-in-1 or 7-in-1 cable helps. It lets one panel work with several stations without buying a separate cable for each plug.
For a station specific pick, see the best Jackery Explorer 1000 V2 solar panel guide. It focuses on panels and plugs that suit that model and its input limits.
How do you position a portable panel for the best watts?
Put the full face in direct sun and point it straight at the sun. A panel in shade or facing away will show the same plug connection but far fewer watts.
Unfold every section so no cells sit folded or shaded by another fold. Set kickstands where fitted, then tilt the panel so sunlight hits the surface as squarely as possible.
In the northern hemisphere, that usually means facing south at midday.
Avoid placing the panel on hot dark ground if you can raise it slightly for air flow. Heat lowers output, and a panel lying flat on asphalt in summer sun may run hotter than one propped at an angle.
Keep nearby gear, chairs, and vehicle shadows off the surface.
Recheck the angle after an hour. The sun moves enough that a panel set at breakfast will not stay optimal at lunch.
Small tweaks often add more power than swapping cables.
How much solar power can your Jackery accept?
Your station input limit caps charging speed, even if the panel is rated higher. A 200 W panel connected to a station limited to 100 W will not force 200 W into the battery.
Check three numbers before you buy or connect a panel. You need maximum input watts, acceptable voltage range, and plug type.
If panel voltage sits outside the station range, do not connect it directly.
Cloudy weather also lowers output. Portable panels are rated under standard test conditions with strong direct sun, so a cloudy day reading well below the rating is normal.
Efficiency ratings, such as 23.5% or 25%, describe how much sunlight the cells convert, not a promise for every hour.
A higher watt panel still helps on cloudy days and early or late in the day. It gives the station more to work with when light is weak, while the station limit protects the battery when light is strong.
Which panel suits a Jackery setup?
Pick watts based on your station limit and how you carry the panel. A 100 W panel is easier to move, while a 200 W panel charges faster in the same sun.
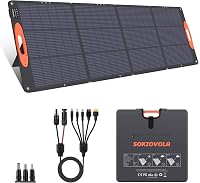
The SOKIOVOLA panel below is a 200 W foldable option with 25% efficiency and a 5-in-1 cable for Jackery and other stations. It suits campers who want faster daytime charging and can carry 16.3 lb.
Its folded size is 21 by 23 inches, so it fits car camping and RV storage better than long backpacking trips.
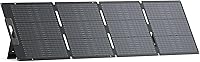
The ZOUPW panel is a 100 W option at 9.5 lb with 23.5% efficiency and a 5-in-1 cable. It suits smaller Jackery stations and lighter loads, and it folds to 24.13 by 21.06 by 1.77 inches.
Its adjustable kickstands help you angle it toward the sun without propping it on rocks or bags.
If your panel already has the right plug, you may not need another panel at all. Spend first on correct connectors and positioning, then upgrade watts if your station can use them.
When do you need an adapter or extension cable?
Use an adapter when the panel plug and Jackery input differ. That is common with third party panels that end in MC-4 connectors.
A multi tip kit is useful because Jackery plug sizes vary by model. The Tonton kit below includes DC7909, DC8020, DC6530, DC5521, DC35135, XT60, and Anderson tips on a solar connector cable.
At 110 cm with heavy duty copper wire, it is meant to bridge MC-4 panel cables to many portable stations.
An extension cable answers a different problem. It helps when the sunny spot sits far from your station, or when you want the station in shade while the panel stays in sun.
Our guide to the how to use the Jackery 10m DC extension cable plus covers reach, cable care, and safe routing.
Longer cables add resistance and trip risk, so keep runs as short as you can. Coil extra cable loosely, keep plugs off wet ground, and never drive over a cable.
How do you set up Jackery solar panels for camping and RV use?
Set the panel where sun hits all day, then run the cable to a shaded station. That split setup protects the station and keeps the panel productive.
At a campsite, place the panel in the open and keep the station under a canopy or inside a tent vestibule. Route the cable along a visible path, not across a doorway or camp chair legs.
For RV use, a suitcase style panel works well because you can move it as shade changes. Our suitcase solar panel setup guide covers placement and cable handling for that style.
A balcony setup has similar limits, so the best portable power station for balcony solar setup guide can help you match panel size to a small space.
Keep the station display visible if you can. Watching input watts while you adjust the panel teaches you more in ten minutes than any spec sheet.
What mistakes slow Jackery solar charging?
Shade, wrong plugs, and ignored input limits cause most slow charging. Partial shade is especially harsh because one shaded cell group can drag down a whole section.
Common mistakes include leaving a panel flat and facing the wrong way, folding a corner back into sun, and using a plug that fits loosely. A loose barrel plug can show zero or flickering watts.
Push it in fully and check that the station display responds.
Another mistake is trusting wire color across brands. The Tonton kit notes that red is positive and black is negative, but other brands may differ.
Confirm polarity on your panel and station before you connect a new adapter.
Heat and dust also matter. Wipe the panel surface with a soft damp cloth when dirty, and avoid cleaning it with harsh scrubbing.
Fold it only after it cools and the cable is disconnected.
How do you check that charging is working?
Look for rising input watts and a charging icon on the station display. Those two signs tell you the panel, plug, and station all agree.
Plug in the panel with the station on and watch the first reading. Then tilt the panel slightly and see if watts rise.
If watts jump, you found a better angle. If watts stay at zero, reseat the plug, check polarity, and confirm the panel is fully unfolded in sun.
Test one change at a time. Moving the panel and swapping the plug at once makes it hard to know what fixed the problem.
A simple before and after check is enough for most campsite setups.
If you are choosing a station and panel as a pair, the best Jackery power station solar panel guide can help you compare matched options before you buy.
How to set up Jackery solar panels: final checklist
Match the plug, respect the input limit, and chase direct sun. Those three rules cover most successful setups.
Before you leave, confirm the plug type, max input watts, and voltage range for your station. Pack the adapter kit if you carry more than one panel or station.
Check the panel for cracks, loose kickstands, and frayed cable ends.
At the site, unfold the panel fully, angle it toward the sun, connect the correct plug, and watch the display. Adjust the angle as the sun moves and keep extra cable neat and dry.
That routine is the practical core of how to set up Jackery solar panels for camping, RV trips, and backup power.
Frequently asked questions
Which plug does my Jackery station use?
It depends on the model. Older and smaller Jackery units often use DC7909 or Anderson, while newer large units often use DC8020.
Check the input label on your station and match the cable end exactly before you connect.
Why does my Jackery show low solar watts?
Low readings usually come from shade, a flat angle, heat, or a panel rated above your station input limit. Move the panel into full sun, angle it toward the sun, and check that the connector is fully seated.
Can I chain two solar panels to a Jackery?
Only if your station manual allows panel chaining and the combined voltage and watts stay within its limits. Otherwise use a single panel that fits the input range, or use an approved adapter setup.
Do I need an adapter for a third party panel?
You may, if the panel cable ends in MC-4 and your Jackery needs DC7909, DC8020, XT60, or Anderson. A multi tip kit can solve that mismatch without cutting any cables.