How to Use the Jackery 10m DC Extension Cable Plus
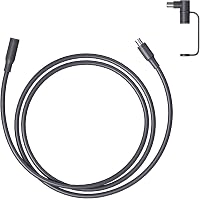
Use the Jackery 10m DC extension cable plus to move your solar panel farther from the power station, only after you confirm the connector type, polarity, and input limits match. Route the cable flat, keep connections dry, and test the setup before you rely on it for charging.
On this page (8 sections)
- How does the Jackery 10m DC extension cable plus work in a solar setup?
- What should you check before you connect a 10m extension cable?
- Which connector types do Jackery setups and adapters commonly use?
- How do you route a 10m cable safely across a campsite?
- Where should you place the panel when you use extra cable length?
- Which panel and adapter options pair well with a long cable run?
- How do you test the setup the first time you connect it?
- What safety rules should you follow with outdoor cables and connectors?
Use the Jackery 10m DC extension cable plus to separate the panel from the station, so the panel can sit in open sun while the station stays in shade or inside a canopy. That extra length helps on campsites where the best sun patch is not right next to your gear.
A 10 meter run also changes the setup in small ways. You need to plan the cable path, check that the connectors match, and keep the joints dry.
Think of the cable as a placement tool, not a power booster. It does not raise panel output.
It lets you put the panel where sunlight is strongest, which is where the gain comes from.
How does the Jackery 10m DC extension cable plus work in a solar setup?
The cable links the panel lead to the station input, so the panel and station no longer need to sit side by side. You connect one end at the panel and plug the other end into the station.
Each end must match. Panel plugs, station plugs, and adapter plugs are not interchangeable, and a cable that fits one Jackery model may not fit another.
Polarity also matters. If positive and negative are reversed, the station may refuse the input, so check the marks on the plugs and the station manual first.
A long cable lies on the ground and creates trip points where a connector can be pulled. Lay the run out before you connect, so you are not dragging a live connection across rough ground.
The cable does not change panel voltage or the station input range. It only carries power between the two points you choose.
What should you check before you connect a 10m extension cable?
Start with panel output voltage and the station input range. The SOKIOVOLA 200W panel lists 18 volts and works with stations rated between 11V and 60V.
The ZOUPW 100W panel lists 20.16 volts output and 24.3 volts maximum. That gap shows why wattage alone is not enough to judge compatibility.
Next, check the current limit. The Tonton 7-in-1 kit lists 10 A maximum and 48 volts of direct current maximum, and your cable and adapter must stay inside those limits.
Check the connector type on both ends and note the exact plug names. Inspect insulation and each plug for cracks, bent pins or dirt, since a damaged joint can heat up or let in water.
Confirm polarity before the first connection. The Tonton kit notes red is positive and black is negative, and warns that different brands may use different polarities.
Which connector types do Jackery setups and adapters commonly use?
Jackery related setups use several different DC plugs. That is why a single fixed plug rarely covers every station in a camp.
The Tonton 7-in-1 kit includes DC7.9 by 0.9mm, DC6.5 by 3.0mm, DC5.5 by 2.1mm, DC3.5 by 1.35mm, Anderson, XT60, and DC8.0 by 2.0mm connectors.
The ZOUPW 5-in-1 cable includes DC8020, XT60, Anderson, DC7909 or 8mm, and DC5521. Its list names DC8020 for certain Jackery Explorer series and DC7909 for Jackery 240, 300 and 500 models.
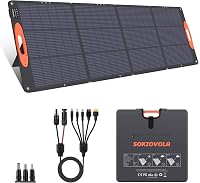
The SOKIOVOLA package includes a 5-in-1 cable with XT60, DC5521mm, DC7909 at 8mm, DC8020mm and Anderson. The panel side uses MC4, so the adapter bridges MC4 to the station plug.
The station plug decides the adapter. Match the adapter to your exact station model and do not force a similar looking barrel plug, because a wrong fit can give a loose and hot connection.
How do you route a 10m cable safely across a campsite?
Plan the route before you unfold the panel. Choose a path that avoids doors, foot traffic and sharp tent pegs, and keep the cable away from water pools.
Lay the cable in a gentle line with no sharp bends at the plugs. Sharp bends stress the pins and can break the lock on a male solar connector.
Keep joints off wet ground where possible. Raise a connection on dry ground or a small mat so it does not sit in dew, mud or a puddle.
Do not run the cable under a vehicle tyre or a heavy hatch. Weight on the cable can damage insulation and change the resistance of the run.
Leave small slack at each end so a light tug does not pull a plug halfway out. Walk the route after setup and route any crossing along the edge, not across a walkway.
Where should you place the panel when you use extra cable length?
Place the panel in full sun with no shade from trees, tents or vehicle roofs. Even a small shadow can cut output from a section of cells.
Aim the panel directly at the sun and keep it level. The SOKIOVOLA description advises that position for best results, and notes output varies with angle, weather and temperature.
Use any kickstands or legs the panel provides. The ZOUPW 100W panel has two adjustable kickstands that can angle the panel at 45 degrees to capture more sunlight than a flat layout.
Keep the station in shade or under a canopy if that suits its ventilation needs. Avoid placing the panel where wind can knock it over, and reposition in small steps while you watch the station input.
Which panel and adapter options pair well with a long cable run?
A long cable is only useful if the panel, cable and adapter match. These three product options show three different ways to build that chain.
Tonton 7-in-1 Solar Panel Connector Kit for station adapters
The Tonton kit is an adapter solution rather than a panel. It includes one universal 7-in-1 cable with a total length of 110 centimeters, or about 3.6 feet.
It uses 12AWG and 14AWG heavy-duty copper wire for low loss and low heating. The built in lock on the male solar connector helps with quick connection and disconnection.
Its Anderson plug has manually adjustable positive and negative terminals. You slide down the retaining clip, swap the terminals by hand and lock them back in place with no tools required.
The kit lists compatibility with EcoFlow, Jackery, Goal Zero Yeti, Renogy, RC battery, RV and many 10W to 200W solar panels. It carries a 30-day replacement or refund guarantee and a one year warranty.
SOKIOVOLA N-Type 200W panel for higher wattage in open sun
The SOKIOVOLA panel weighs 16.31 pounds and folds to 21 by 23 inches. It uses A plus grade monocrystalline cells with conversion efficiency up to 25 percent.
Its ETFE coating gives waterproof and dustproof durability for outdoor use. The panel has a magnetic carry handle and four holes for attaching it to an RV.
The package includes a 10.49 foot 5-in-1 extension cable, a carry bag and a user manual. It also includes a 12-month warranty and a 30-day refund guarantee.
Its operating voltage of 18V suits most portable stations rated between 11V and 60V. Stations with a lower maximum input power limit will draw only up to that limit.
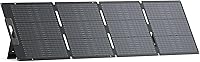
ZOUPW 100W panel for a lighter foldable setup
The ZOUPW panel weighs 9.48 pounds and folds to 24.13 by 21.06 by 1.77 inches. It uses Grade A plus monocrystalline cells with 23.5 percent efficiency.
Its ETFE lamination gives IP67 waterproof protection for the panel body. The zippered pocket protects the built in controller and cables from moisture.
The kit includes a 10 foot 5-in-1 solar connector cable and a user manual. It also provides a 12-month warranty and lifetime technical support.
It adds a direct charging hub with one USB-C PD port and two USB-A ports, including QC3.0. Keep the hub dry while using it for phones and tablets.
How do you test the setup the first time you connect it?
Connect the panel side first, then the station side. That order lets you check the panel lead before the station sees any input.
Watch the station display for the first minutes of charging. Look for a normal input reading and a steady charge rate rather than a warning or a sudden stop.
If the station will not accept the input, stop and recheck the adapters. Do not keep retrying with a different plug until you have confirmed polarity and voltage.
Disconnect and reconnect each plug once to check the fit. A correct plug seats fully and the lock holds without force.
Check the cable and plugs for warmth after ten minutes of charging. The Tonton kit is built for low heating, but any hot joint means you should stop and inspect it, then move the panel a small distance and watch the input change.
What safety rules should you follow with outdoor cables and connectors?
Keep connections dry even when the panel is waterproof. The ZOUPW panel body is IP67 waterproof, but its USB hub and cables are not fully waterproof.
The Tonton kit lists IP67 specification and weatherproof outdoor use. That rating does not replace keeping a station input dry.
The SOKIOVOLA panel lists IP68 waterproof protection with its ETFE coating. Still keep the station end of the cable out of rain and standing water.
How do you confirm polarity before you connect?
Confirm the positive and negative poles on both the panel and the station. The Tonton kit warns that different brands may have different polarities.
Use the red wire for positive and the black wire for negative as a starting check. Then confirm against your own panel and station labels, because brands differ.
For the Tonton Anderson plug, use the adjustable terminals if your setup needs a swap. Slide the retaining clip down, swap the terminals by hand and lock them back in place.
Never assume a barrel plug matches by size alone. DC7909 at 8mm, DC8020, DC5521 and DC6530 are different sizes and must match the station input.
Store the cable coiled loosely after use. Tight coils and sharp bends can damage the wire inside the insulation over time.
Frequently asked questions
Can I extend a Jackery solar panel cable to 10 meters?
Yes, if the extension cable matches your panel and power station connectors and stays within the station's voltage and current input limits. Check polarity before you connect, keep the joints out of puddles, and confirm charging starts at a low rate.
If the station will not accept the input, stop and recheck the adapters.
Where should I place the panel when I use a long extension cable?
Place the panel in full sun, aimed at the sun, with no shade from tents, trees, or vehicle roofs. Keep the cable run as direct as possible and avoid sharp bends at the connectors.
A short walk to adjust the angle often gains more power than a longer cable run.
What should I check before connecting an extension cable?
Check the panel output voltage, the power station input range, the connector type, and the positive and negative poles. Make sure the cable and any adapter are rated for outdoor use and that nothing is cracked or bent.
Connect the panel side first, then the station side, and watch the first minutes of charging.
Do I still need an adapter with a 10m extension cable?
Often yes, because panels and stations use different plugs, such as MC4 on the panel side and a barrel or other DC plug on the station side. A multi-connector kit can cover several station models in one bag.
Match the adapter to your exact station instead of assuming one plug fits all Jackery models.